
It’s been a while since I updated my blog! It’s hard to keep active on here and find the time to write, no matter how many times I tell myself to sit down and write something. I do try to keep my social media a bit more active with photos of what I’m doing. My second term of school has a reading break (a week off) and I was fortunate enough to get Bookbinding Level 3 organized and happening! You can read about level 1 and 2 in earlier blog posts.
I’ve been very excited to take level 3, as it’s when we start working with leather and do two books in leather (spine and corners/fore edge). So, here’s a brief look at what we did!
To begin with we made hooked end-papers, and folded the signatures for our books. Those went in the press and when they were ready we determined the position of the sewing holes. For one book we would be sewing on raised cords, on the other we would sew on flattened cords. The book on raised cords needed a little bit of math done to figure out the spacing of the panels. Panels are the sections between the cords. The bottom panel is the biggest, the top the second biggest and the middle panels the same size.


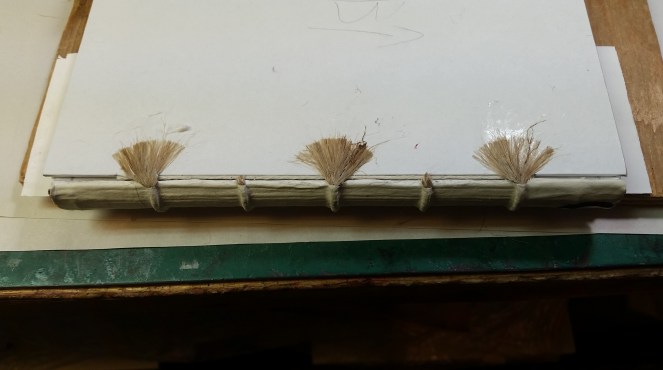
Once the holes were pierced we began sewing. We used a lap stitch to sew over the flattened cords (something we learned in previous levels), but we learned a loop stitch to sew over raised cords for this level. Below in the first photo is the raised cords, and the second photo is the flattened cords.


Once the textblocks were sewn and the spines pasted up, it was time to round and back them. We learned rounding and backing in level 2 so again this wasn’t new to us. The only difference now was the style of binding we were doing. In level 2 we did case bindings and we rounded the spines to 45 degrees, creating a groove back structure. In level 3 we rounded to 90 degrees to create a tight back structure.


After rounding and backing the books we used the plough to trim the edges.


Once the edges are trimmed we did some edge treatment (sprinkled the edges with dye and waxed the head of the book) and then sewed on the endbands.

Once the endbands were on and the spine was lined and we put the boards on. Unlike in level 1 and 2 where we did case bindings (the cover is made separately from the text block), this time we attached the boards to the cords sewn onto the spine. Due to time constraints we didn’t lace the cord through the board.
Once those were on, we filled in the spine a little more. Typically we would need to do more layers of paper and spend more time sanding but again give the time constraints we only did two layers of paper and sanded the spine after those had dried. Below is a picture of the spine, colored at the high points so that when we sand down the layers of paper we would know when we’ve sanded far enough.

Next came paring the leather for the spines! This is the challenging part of the course as paring leather takes a lot of practice and most of us only had a few days experience with it prior to the course when we took the introduction to leather course. Once the leather was pared, we pasted it up for the spine.


And then we put the leather on the spine! For the flat spine, it got tucked in the hollow tube on the back of the spine; for the raised cords, it got tucked in on itself. After tucking it in and getting it on, we had to make end caps. This was done by gently tugging a bit of the leather out from the head and tail, and then folding it over to touch the end bands and molding it down a little to create a flat top.


After this, they had to dry overnight. The book with the raised cords was tied down to dry.


The next day started with more paring! We pared the corners and the fore edge strips and got those pasted up and put on the books. Once those were dry we filled in the covers with blank paper (to help even out cover so when we lay the covering paper on it will look nice).


On our last day, we covered the covers! We also put down the inside joint and end papers. These took a little time, as the inside joints must dry open so we could only do one side, let it dry, then do the next. These joints were done in leather.


And finally, we were done! Since we had to wait for things to try, Dan told us a little about blind tooling, and then let us also play around with some of his gold foil and brass stamps. I put a little dragonfly on my blank journal book.


And that was level 3! I have two more core courses left to take with CBBAG before I can get the certificate of completion. But we also have several other workshops planned with our local chapter which I am super excited about, including an album course in April! Fingers crossed the courses work out and I can take them, it will certainly help keep my blog active. Otherwise, I still intend to do my best to post here somewhat regularly but no promises! Follow me on Facebook, Twitter, or Instagram to keep up with some of the smaller projects I’m working on!
Until next time,


One thought on “Bookbinding Level 3”