
There is so much we learned in this course that it’s hard to know where to start, even just to give everyone an overview! I took this course earlier this summer (we had to take advantage of the sunshine months), and it was very informative. Once again, I took the course through CBBAG and taught by Dan Mezza.
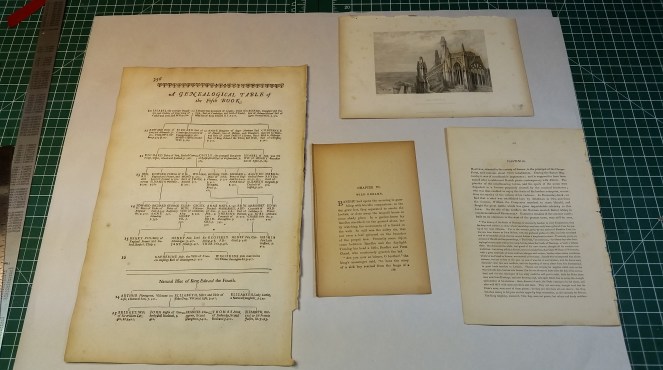
So where to start? We started by getting to know a little about paper and the history of it. Dan gave us an important timeline to take note of how paper has changed over the years. I’d like to leave some of that for a separate blog post so I will just tell you the three different papers we worked with. Our first page was the oldest from the “A Genealogical History of the Kings of England…” dated in the 1600s. This paper is made from hemp. The second book we took a sheet from was “Stanfield’s Coast Scenery… British Channel” from 1864, this is rag paper. The third book we used was “Little Bullets from Batala” from 1905 and this was wood fiber pulp. We also took a photograph from the second book.
One of the first things we did with this paper was we tested the pH levels. Anything  above 5 doesn’t need to be treated, anything below 5 should be. This let’s us know how acidic the paper is. We used pH strips that would give us anywhere between 4-7 for a reading. To do this we put a drop of water on the corner of the paper, and placed the pH strip in the water. Once we were done we gently sponged the corner to reduce possible tide lines that would be created by the water.
You can also tell a lot by smelling a book! That sweet smell in books that we love so much is caused by acid.
The next step was to check to solubility. In general, the ink on the paper that is printed on isn’t going to come off. Ink from notes or signatures though is a different matter. To test if these will stay on or come off in a washing we gently used a Q-tip or blotter with a little bit of water or alcohol to test it the ink would lift off.
Once all the tests were done we moved onto cleaning the paper. First came the dry cleaning. The purpose of this is to remove the surface dirt before washing it, it’s only done if necessary. There are several materials one can use but we used powdered eraser. Sprinkling the eraser on we used cotton balls and moved in a circular motion to gently brush off dirt.

Next, we washed the paper; this is done in a flat-bottomed tray, with a liner in between the rows of paper to support the paper. To wash the paper, we fill the tub with water, place down the support liner and submerge it with a plexiglass rod. Place the paper gently on top, and a liner atop those. You can do several layers. With the rod gently roll over everything and then let it sit for a little while before rolling again and changing the water. The water will be pretty gross! We changed the water three times, but you can also go until it runs clear.
The purpose of washing the paper is to improve the health and appearance, to wash out degradation products, to neutralize acids and to bring the pH closer to the neutral 7. In our last washing we also added a little bit of ammonia. This is to “shock’ the paper with pH.


Once the paper is washed we used the liner to bring the paper over to the drying racks. These are screens held taut in a frame. An additional loose piece of screen is laid over them, this puts equal pressure on both sides while it dries, helping it dry flat.

Once they were dry, we had the option to sun bleach them. This is done by placing them in a bath of water and putting them outside. A sheet of plexiglass is laid on top and slightly raised to let the humidity out.

This process was so bright! Every so often we came to check on them to make sure that the paper was still submerged in the water, if not we would gently roll over it with the rod and then let them sit for a while. They were left outside for a few hours in the sunshine! Once they were done we gave them a rinse and put them back on the drying racks.
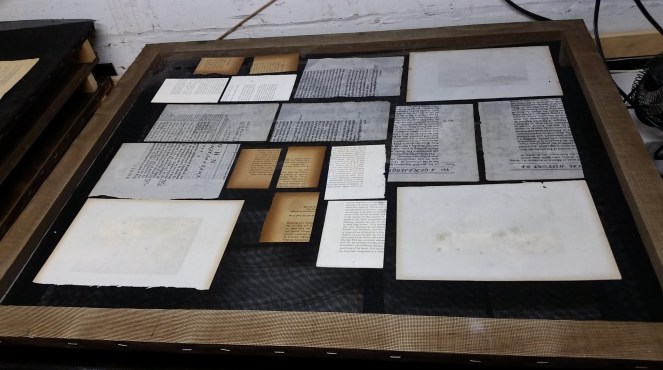
In the photo above you can already see the color difference! You’ll notice though that one of our pages was hardly affected by it!
After everything was washed and bleached we moved on to repairing the paper, if there were any with cracks or holes in it we used the light table and kozo paper to carefully repair the paper.

Once all of that was done, the paper was then resized. This is done after paper has been washed because generally washing will wash out the sizing! Resizing the paper strengthens the fibers and adds protection to the surface. It also stops the ink from feathering if you add ink to the paper later. There are many types of sizing and for this we used several types to see the difference they made. Unfortunately, this is difficult to show in a photo but I hope to do a blog post on it separately with some videos. We also did a process called alkalization which helps bring the pH above seven and adds a buffer to prevent future deterioration from acid.


Above you can see the papers from the books. Each sheet was cut into four. Each quarter shows a different process. Once piece is the control piece. One has only been washed, one has been washed and bleached, one has been washed, bleached, alkalized and resized. You’ll notice that the last picture, there is hardly any difference, this is common for the wood-pulp paper of that time period. The acid has already done all the damage it can and there is little that can be done to help it. The most noticeable difference was done to the second book, which was rag paper and the first book which was hemp.
During the class, we also worked on a few of our own pieces. I worked on the sheet music for Meet Me in St. Louis. Here are some before photos:


Some photos of the repairs I did:


And final photos:


For a side by side comparison, here is the cover of the music:


It was a great class, we covered so much that it’s hard to put it all in one post! As I said, I will do a post on paper to cover a lot of the other stuff I learned during the class. Beyond paper there was even more treatment and repair techniques we learned, for example how to remove tape! This is a very broad overview of what we did!
Until next time,


Fascinating post. It was great to have book repair demystified a bit. Thanks
LikeLiked by 1 person