
Alright, I’ve been meaning to do this post for a while and finally got around to taking the pictures for it. If you Google bookbinding tools, you’ll probably find lots of images and lots of posts about a lot of tools – I’m not covering all the tools. I am covering the bare minimum. These are the essential tools and all I need to make the cloth and paper bound books.
Arguably one of a bookbinder’s most beloved and essentials tools is a bone folder. Bone folders come in various sizes are used for creasing paper to ensure that you have a sharp fold. Wiki says that: “Often made from the leg bone of a cow, deer, or similar animal and ivory alternatives made from plastic now exist. However, those made from bone may be less likely to leave residue on the work piece.” Bone folders are typically flat on one side and rounded on the other – you do this yourself by sanding the bone folder. Another thing bookbinders will traditionally do is swipe the bone folder across their cheek, nose, or forehead. The oil helps maintain the bone folder. Nowadays you can get Teflon folders which work great but there’s nothing like a good bone folder!
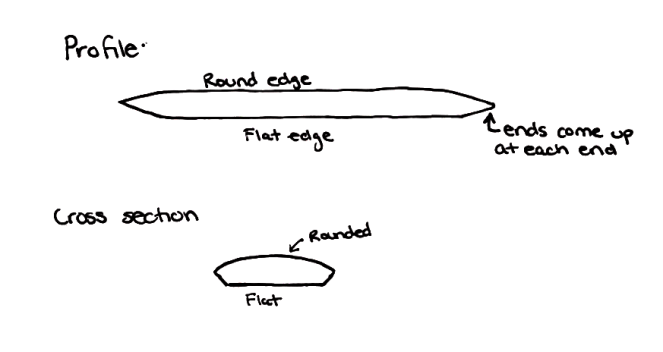
Below is a sketch I did of how your bone folder should be shaped.
Next up you’ll want a straightedge (ruler) and squares. Very seldom do you use the ruler for measuring, it’s used instead of create straight edge. Try to find a ruler that is metal and doesn’t have a cork back (the cork will collect dirt). For squares try to find brass ones – brass is the only metal that won’t stain leather.
I currently only have one of each and my square is not brass but as I am not working with leather yet this is okay. It is on my to buy list though!
Knives!
There are three kinds of knives you’ll want as a bookbinder: a mat knife, a slitting knife and scalpels. For scalpels you’ll want least two of them, Dan (my teacher) recommends a #11 and a #23 blade. Below on the left you can see a scalpel, a mat knife and then on the right a slitting knife.


Next, you’ll want a piercing awl. This is a needle with a handle and you can get ones specifically for bookbinding (carpenter awls are too big). A variety is good, so you can have different sizes. The awl is used for punching the sewing holes into the paper. A good pair of scissors is also important!


Sewing needs are another tool!

Needles – a really good brand is John James. The lower the # of the needle the bigger the needle (this is the English way, American do the opposite). Some good numbers are #3,5,7 – 7 being very good for silk and end bands. 5 is good for general sewing.
 Dividers are also an important tool. These are used for measuring. They ensure that you get the same measurement each time as you work. They come in a variety of sizes. When purchasing some do make sure that the tips touch when closed!
The last tool I have to show is a paste brush. This is used for pasting the paper to the boards. The brush bristles are often stiff, usually pig bristle. When looking at brushes make sure that the bristles are stiff enough but not too long and they should be slightly springy. A limp brush won’t spread the paste. Also try to find one that has some sort of protection – notice the red thread around the bristle before the brass. This keeps it neat. I will explain more of this in another blog post! If you’re wondering where you can purchase these tools check out stores like: Hollander’s and Talas. Amazon will also carry some of these. I got all of mine (except the brush) through George Hill & Co. They offer an entire starting kit, which comes in a nice leather carrying case:

There you have it! Some of the very basic tools. In another post I’ll talk about presses, and another post I’ll talk about materials. So keep an eye out for those!
Until next time,


One thought on “Bookbinding Tools 101”