
Earlier this year I took a class on sewing structures. In this course we made models for some different sewing types. It was really fun class and I enjoyed making the models and learning about the different types of sewing and the history! Below are my notes from the class and pictures of the models I made.
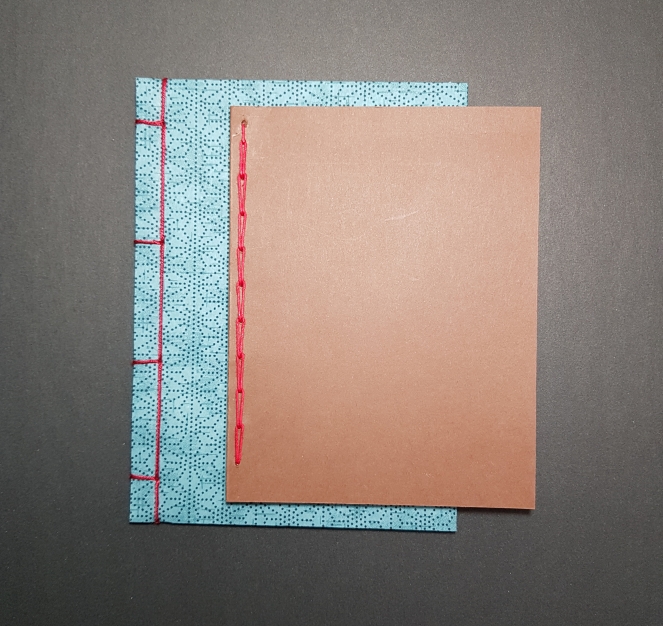
Stab Sewing:
- the simplest form of sewing
- used in the earliest codices (2nd-3rd c.) and still used in the East (Oriental bindings)
- used in the 15th-18th c. for books sold in wrappers (these were meant to be resewn)
- can make book difficult to open
- should only be used if margins are sufficiently wide and paper is flexible
- book must be designed for this form of sewing
Coptic Sewing/unsupported sewing:
- used in the earliest codices where book blocks formed into sections
- no sewing supports (thongs, cords, or tapes)
- used throughout Europe – 3rd to 7th c.
- in many ways similar to modern machine sewing

Pictured above: Coptic variations: (L to R) 1 down, 2 down, 3 down
Pictured below: French link stitch

Raised Throng or Cord:
- by the 8th century a more substantial method of sewing replaced the coptic sewing
- used sewing supports – thongs or cords
- leather thongs used first, replaced by tawed
- by 11th c. hemp, jute, and flax used
- early books used double thongs or cords, thread carried around in a fig. 8, later single cords replaced the double cords
- in a binding in which all elements are properly balanced this form of sewing will provide a gentle spring like force, distributing the stress of opening the book over a relatively wide area which helps keep the shape of the book
- is the best form of sewing

Pictured above: Sewing on tawed things: (L to R) two thongs, split thong, twisted split thong
Pictured below: Sewing on raised cord

Pictured below: Packed sewing on raised cord

Pictured below: Sewing on double raised cord

Recessed cord sewing:
- first used in late 16th c. for cheap retail bindings
- is a lap sewing
- most modern leather bindings use recessed cords and a hollow back, and may use fake raised bands
- book printed on stiff paper open more easily with recessed cord sewing
- may be less durable – cords are thin
- problem of sawing into the text block is damaging to the text block
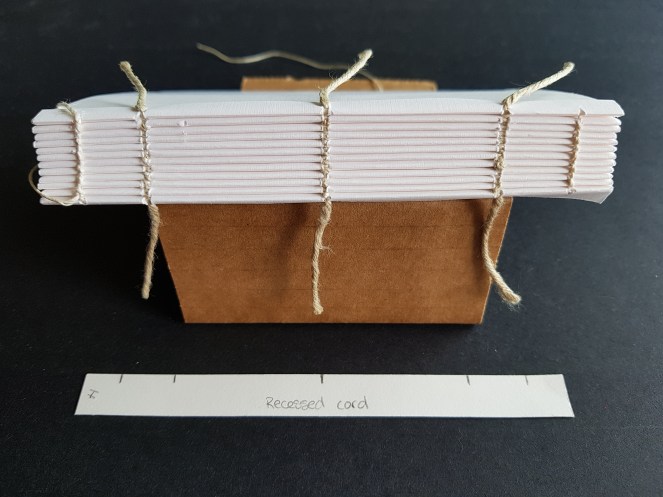
Pictured above: Recessed cord sewing
Tape Sewing:
- first used in the 2nd half of the 19th c.C for publishers’ case bindings
- it is a strong sewing, opens easily
- most often a lap sewing but can be a loop
- is not used in leather bindings
- is fast to do
- replaced today with machine sewing and is a recessed sewing
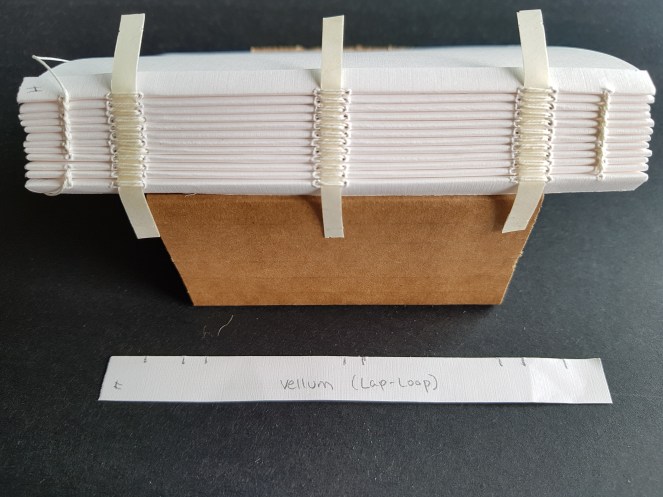
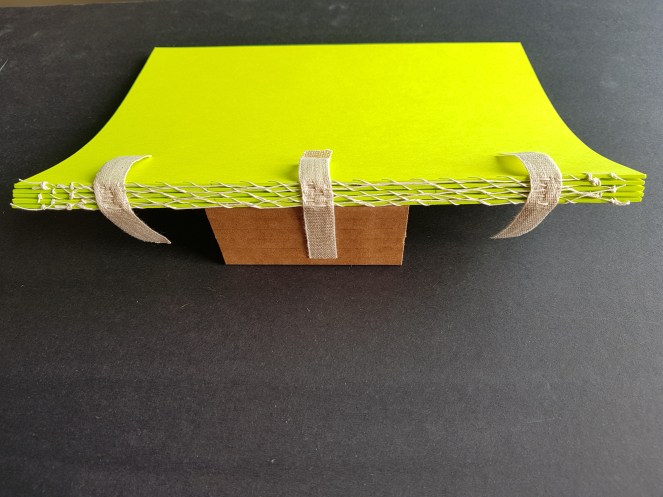
Pictured above: Sewing on vellum supports (lap-loop stitch)
Pictured below: Sewing on tape (lap stitch)

Flattened Cord:
- same as tape sewing but with a lower profile on the spine – makes it easier to have a flat spine and can be used for leather

Pictured above: Sewing on flattened cord (lap-loop stitch)
Two Sheets On – or – Two up/Two on
- used in early 17th c. – continued to be used until last quarter of the 19th c.
- can be used on tape or cord
- object was to save time and money
- was replaced with book sewing machines
- today used to reduce swelling
- 1st and last sections sewn all along

Pictured above: Two-up on tape
Crenelated:
- used to repair (reduces swell)
- only time its used is to resew text to fit into the original case

Pictured above: Crenelated sewing
Two-needle sewing:
- example of “machine” sewing, using two needles
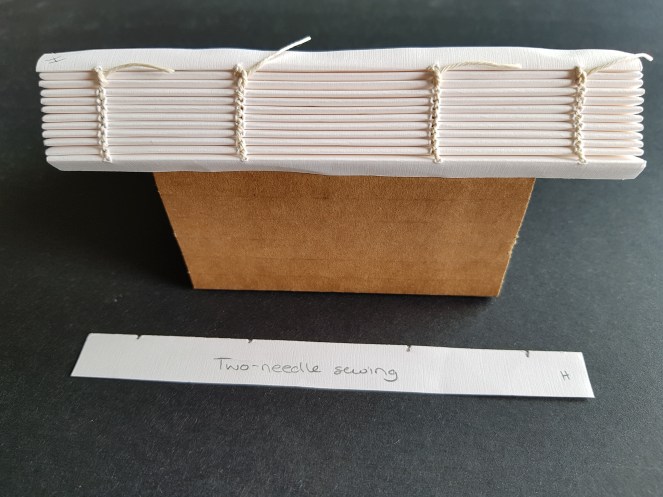
Pictured above: Two-needle sewing
Single sheets:
- Option for single sheets:
- adhesive binding or
- adhesive binding and recessed cord or
- whip stitch “sections” together, then sew sections together by linking them through previous whip stitching and sewing on to tape (useful for heavy single sheets)
Pictured above: single sheets sewn together using a whip stitch and tape
There are of course other variations on sewing, my teacher simply choose common ones that we are likely to find when we work with books and others that are useful to know for work. It was a great course and I pleased to have made these models. We are currently working through a course on end-paper models, so hopefully I will get a blog up soon with information on the various types of end-papers we covered!
Until next time,

If you are enjoying this content and would like to help support my bookbinding journey please consider a small tip! I’m currently saving up for a working miniature nipping press.
https://ko-fi.com/ariellesbindery

Nice post! The information you provided is very helpful
LikeLiked by 1 person
Nice overview, thank you very much!
I have a question about the “whip stitching sections together”: is this a two step process? Do you first sew sections of single sheets and after that sew those sections together?
Thanks for answering
Michael
LikeLiked by 1 person
Hi Michael,
Thank you for the comment! Yes whip stitching sections together is a two step process. What I do first is make sure the pages are square together, and put them in a press. I then put a very light layer of PVA glue along the spine. Let it nearly dry. This will allow you to then break the book off into sections, and the glue keeps them square/nicely together within each section as you sew them, it just makes it easier. After I have all the sections, I then whip stitch each section, and then finally those sections can be sewn together.
Hope that is clear!
Arielle
LikeLike
I’ve never heard of crenelated sewing. How do you start it? Also, how is swell reduced? Is it like the Two on sewing method but with no sewing supports?
LikeLike
I am also interested in the crenelated binding! I’m having trouble finding information about it elsewhere… is there another name for it that I can use to find more information about it? Is it related to a chain stitch?
I know it’s been a while so I hope the author will reply eventually or someone else can shed some light on this!
LikeLike