
The second weekend in April I took part in a day long workshop with James Spyker. James Spyker is a member of the Toronto chapter of CBBAG. He’s very talented in his work and it was great to take a workshop with him!

This was my first time working with miniature bookbinding. We were going to aim to make two books during the workshop but we got through 1.5 and I finished the last one at home. This was also my first time covering a book in leather. James had come prepared and pared most of the leather so we didn’t have to do leather paring unless we were interested in doing so. He also came prepared with all the little boards and paper for text blocks ready to go! Working with mini books is a good practice space for paring leather and while I didn’t pare any that day, I hope to practice paring soon and make additional miniature books for fun!
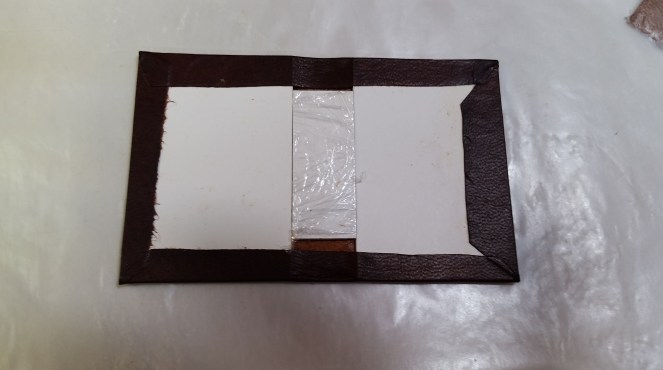
After James explained the how-to process of the first steps we started work on our own. First was measuring, the leather was cut bigger than needed and so we measured the size of the cover against the leather and cut enough to have a turn-in.


Once that’s done the corners are cut – you could pare the corners properly for leather and do a very nice job, but for simplicity sake we treated it as if it was paper so we cut the corners and folded them in. Once the corners are cut, we pasted the leather up and fold over the edges. You’ll notice the middle part is covered in plastic wrap – this is because we removed it later and we didn’t want it to stick to the leather. The middle piece is actually only used to keep the space between the boards. It’s necessary because as the leather dries it tightens and will shrink. If the piece wasn’t in the center, the boards would come closer together during the drying process.
After that we took a break for lunch and let the cover dry. Once it was dry we put on the inside leather. This book is not following a traditional binding method. The sections of the book will not be sewn together but rather sewn into the leather once the cover is made. As they are sewn individually it is easy to snip one section out and later replace it, if someone wanted to!


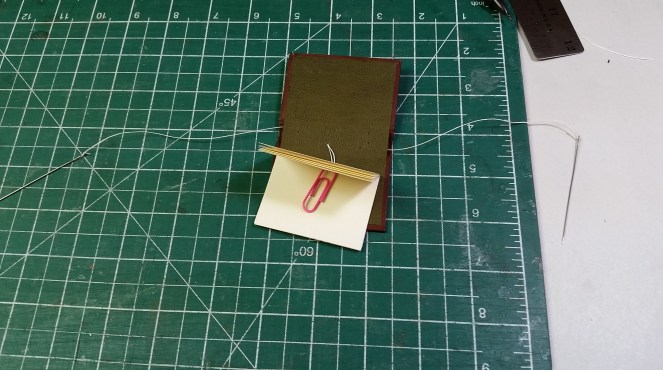
After the inside leather is glued and dried we mapped out the holes for the sections and pierced them through the leather.

And then it was time to sew! It’s a little harder to see in the photo below but there is a needle on each end of the thread; we’re doing a simple three hole pamphlet stitch but doing it a bit in reverse. The paperclip is in the middle of the thread to keep the loop in the middle of the book from going through. The thread comes back through the loop in the center of the book and is knotted.
And once all the sections are sewn in it’s done! This book is a blank book and stands 2.5 inches tall. The other book we started was smaller than this one, standing at only 1.5 inches tall.


The other book we made was a textblock with text in it, we all made a miniature copy of the Universal Declaration of Human Rights. I also have a miniature copy of T.S. Elliot’s The Waste Land. The books are tiny! The first book at 2.5″ was manageable but getting down to working with 1.5″ started to be a bit of a headache. They are quite cute though and something I’d consider doing again.
 The books are great for practicing leather work on, from simply paring the leather, to practicing inlays or a little bit of tooling. As I am just starting with leather I’d likely only be practicing paring. It’s hard work to get it just right. Having a reason to pare the leather, being able to turn it into miniature books would be really fun.
 I could take some old books not under copyright anymore and make miniature versions of them.
If anyone is interested I can post in tutorial for these miniature books, it would go much more into depth about measurements and how-to, let me know in the comments!
Until next time,


Thank you for the post – this looks like a fabulous class. I would love a more in depth tutorial!
LikeLike
I’ll be sure to post an in-depth tutorial soon then! 🙂
LikeLike
Thanks, I am looking forward to it 🙂
LikeLike